
I have created a disk operating system for the 2650 microprocessor, and especially for the Central Data board. P1 DOS is based on Central Data DOS, but contains a number of improvements. For questions and suggestions there is always the feedback-button at the bottom of every page on this site.
Contents
The source code for P1 DOS can be dowloaded below. You may want to try P1 DOS in the WinArcadia emulator. To do so, download and install WinArcadia and download and unzip the raw diskette image. Then follow the steps below.
Using WinArcadia
- Start WinArcadia, and pause the emulator using the Run/Pause button in the toolbar.
- From the Options menu choose “Machine | Central Data 2650”.
- From the Options menu choose “BIOS | IPL v1.1”
- Open the floppy disk drive from the Tools menu. Click the “Insert disk” button and select the P1 DOS disk image.
- Start the emulator using the Run/Pause button in the toolbar.
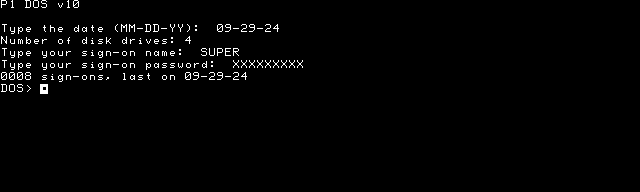
P1 DOS will now boot. First it will ask for the current date, then for a username to log on. The disk image contains two users: a unprivileged user called USER with password “USER“, and a privileged user called SUPER with password “SUPER“. Some things you can do:
- Create a file using ALLOC, and set access permissions using ICODE and CCODE.
- Create a new user with USER, and switch between users using SIGNON.
- Change your sign-on password using PASSWORD.
- See how the ICODE and CCODE allow or prevent you to COPY, RENAME or DELETE files, while signed-on as different users.
P1 DOS Manual
P1 DOS is an improved version of the original Central Data DOS. It is fully compatible with floppy disks written by Central Data DOS. Software-wise it is backwards compatible, provided that programs only use the DOS entry points in the table at the start of DOS. This means that all well-behaved programs for Central Data DOS will work on P1 DOS, but not necessarily the other way around. In the text below “DOS” refers to either CD DOS or P1 DOS.
Entering commands
Entering text on the command line:
Backspace = erase last character (or all input when entering a codeword)
Ctrl-U = repeat (pre-fill) previous input
Return/Enter = confirm input
Esc = cancel input, return with no text
Some commands require numbers to be entered, e.g. a memory address or a number of blocks. Numbers can be entered either in normal decimal notation, or as hexadecimal. Hexadecimal numbers start with the letter “H”. For example the command “EXEC H2000” starts execution of the program at memory address 0x2000.
Sometimes a secret word must be entered. For security the characters typed are not echoed to the display and X’s are displayed instead. In order to obfuscate the number of characters typed a single character may cause 1, 2 or 3 X’s to be shown. When entering a secret word the Backspace key does not erase the last character entered, but erased the entire input.
Filenames
Filenames consist of three parts: the name, the type and the drive unit. When specifying a filename the type and unit are optional, and will be substituted by defaults set by the DTYPE and DUNIT commands respectively.
The name can be at most 8 characters long, and must consist of letters and digits only. The type can be at most 4 characters long, and can consist of letters, digits and the dollar-sign. The type follows the name, separated by a period. The drive unit can be a single digit from zero to one less than the number of drive units in the system. The unit follows the name and type, separated by a forward slash.
The types NAME and IMAG have a special meaning in DOS, and should not be used. NAME-files are used to store signon-information (see “Privilege and protection”). IMAG-files are used for images, executable programs that are to be loaded at specific locations in memory (see Images).
Filenames use uppercase only; lowercase letters are converted automatically.
Examples:
MYFILE01.BAS/3 fully specified filename
MYFILE01/0 file using default type on drive unit 0
MYFILE01.SAV$ file using default drive unit
MYFILE01 file using default type and drive unit
It is not possible not to have a filetype; every file must have a type.
Privilege and protection
DOS has a fairly sophisticated access and permissions system, consisting of two concepts: multiple users and file access restrictions.
Users and their sign-on
DOS can handle multiple users. Only one user can be signed on at any one time. At startup DOS asks for the current user. At any time another user can sign on using the SIGNON command.
A user can be a normal user or a privileged user. Only privileged users can use certain commands (builtin commands DISKCOPY, DISKRD, DISKWR, and INSPECT, and external commands such as USER). Although normal users can use the LIST command, a privileged user will see more information. External commands can also differentiate between normal and privileged users. The FINFO command for example will show extended information when invoked by a privileged user.
To sign on, the proper password must be typed (unless no password is set for that user). After sign-on, an optional command is run automatically (see AUTORUN). After that, the command prompt is presented to the new user.
Each user has a NAME-file (a file with type NAME on drive unit 0). NAME-files are short (one block only), and contain the password, last sign-on date, number of sign-ons and the optional autorun command. See the documentation in the assembler source for a detailed description of NAME-files. Because of the NAME-files, usernames can be at most 8 characters, and can contain letters and digits only.
File access restrictions
Access to files can be restricted on two levels: for access to the file’s contents, and for modifying the file. The right to modify the file implies the right to access the file. For either level, access can be restricted to:
- privileged users only (System)
- one specific named user (Personal)
- any user who knows the right codeword (Regular)
- any user (Regular, with a blank codeword; no restrictions).
Only a privileged user can restrict access to the System level. Any user (with rights to modify the file) can restrict a file to Personal or Regular.
To set or modify restrictions for accessing the file you use the ICODE (“inspect code”) command. To set or modify restrictions to change the contents you use the CCODE (“change code”) command.
The right to modify the file implies the right to access its contents. When testing the right to access the file’s contents, DOS will first test the change code. If this passes, access is granted (even when the file is only read, not changed). If the change code does not pass then the inspect code is tested. If this passess, access is granted. Otherwise access is refused.
Note: This means that if a ICODE is set without a CCODE, anyone can access the file regardless!
A privileged user bypasses all these checks. Privileged users can modify and access any file, regardless of the change and inspect codes of that file.
Note that files do not have an owner. Any file can in priciple be used by any user. DOS will record the sign-on of the last user to modify a file, and the date when it was modified. Files also have a creation date, which cannot be changed.
Whenever a codeword has been provided (either by the ENTER command, by previous QueryChangeCodeByFP / QueryInspectCodeByFP API calls), that codeword will be remembered and reused for subsequent access attempts.
To make a user privileged, set the change code for the user’s NAME-file to System. Use the command
CCODE «user».NAMEthen choose “S” for System restrictions. To demote a privileged user to a normal user, use the command
CCODE «user».NAMEthen choose “P” for Personal restrictions and enter the username.
Only a privileged user can create another privileged user, which means that each installation of DOS must have at least one privileged user.
Floppy disks and drive units
DOS works one to four drive units, numbered from zero to 3. Drives can be single sided or double sided. If double sided drives are used then the sides are treated as if they were separate drives: unit 0 will be the first side on the first drive, unit 1 will be the second side of the first drive.
Unit 0 is somewhat special: when signing on the NAME-file of the user is always read from unit 0. There is also a default unit (set using DUNIT), for filenames that have been specified without an explicit unit. In P1 DOS this default does not apply to image files (external commands): images always use drive unit 0 unless another unit is specified explicitly.
The number of installed drive units is a constant in DOS. It is defined as NumUnits (default is 03). You can change this according to the number of drives in your system. Note that this is actually the number of the highest drive unit allowed. Add 1 to get the total number of drive units.
P1 DOS was designed to be fully compatible with disks created by CD DOS. Disks have 35 tracks of 9 sectors. Each sector contains a single 256-byte block. The raw capacity of disks is therefore 78.75 kilobytes. The first two tracks of each disk are reserved for file directory information. The usable capacity is therefore 74.25 kilobytes; the FREE command on an empty disk shows 297 free blocks. Each disk can contain at most 64 files.
Files consist of one or more blocks, from a certain starting track and sector up to their final track and sector, and all the blocks in between. The LIST command shows the starting and ending tracks and sectors (but not the total number of blocks). Files must be contiguous. Deleting a file will leave a ‘gap’ that can only be used for other files of the same size or smaller.
Images
Executable programs must be loaded at a specific memory address before they can be run. Image files (created using the IMAGE command) contain the necessary information.
Image files are stored in a special format. They consist of two or more sections. Each section has the following format:
AA AA LN LN By .. Bywhere AA AA is the start address in memory where the section is to be stored, and LN LN is the length of the section (the exact number of bytes). The next bytes are the actual content of the section. Multiple sections can thus be specified. The last section is indicated by a length of zero. The starting address in that case specifies the entry point of the image, the address where execution commences when the image is run.
To execute an image, use the RUN command or simply type the name of the file (with or without the type). If the image is not stored on drive 0, you must specify the drive unit as well.
Utilities
P1 DOS contains a number of essential utilities, to complement the builtin commands:
- FORMAT: will erase and initialise a disk for use by DOS.
- COPY: to make a duplicate of a file.
- FINFO: to show detailed information on a file.
- CASSIN: to read data from the cassette tape interface.
- USER: to create new sign-on account (privileged).
- PASSWORD: to change the password for the current sign-on.
- AUTORUN: to see or change the user’s sign-on command.
- MEMTEST: to verify the correctness of RAM memory.
DOS memory map and startup
Memory map:
0000 - 0FFF ROM contents
1000 - 14FF Display memory
1500 - 17FF scratch static RAM (onboard)
1800 - 1FFF scratch RAM
2000 - 3FFF program space, page 1
4000 - 5FFF program space, page 2
6000 - 7AFF P1 DOS
7B00 - 7BFF open files block
7C00 - 7FFF disk buffers
This gives 18 kbyte (the last 2 kbyte of page 0, and the entire pages 1 and 2) for utility programs and applications. DOS makes no assumptions, and has no requirements, on what memory addresses should be available. The only requirement is that the entire page 3 is available to DOS as RAM. DOS cannot be installed in ROM.
You can use the Initial Program Loader in ROM in addition to or instead of a monitor program. IPL read the contents of tracks 2..4 into memory at 6000. With 27 sectors this exactly covers 6000..7AFF.
You can make a blank disk bootable with the following commands:
ALLOC DOS.SYS/0 27
DISKWR 0 2 1 H6000 27
Or when you have two drives:
copy DOS.SYS/0 DOS.SYS/2Programming using DOS
The programming interface consists of a list of subroutines and routines that can be called from other programs. These (sub)routines provide all necessary functions for handling files and for input/output to the display, keyboard and printer. The routines can be accessed using a table at the start of DOS, by using indirect branch instructions. Do not branch to subroutines directly, but always through the entry points at the start of DOS, so that your programs will work correctly with other versions of DOS. The table starts at address 6004. See the assembly file for more information. Most of the entries are for subroutines that return to the caller when done. A few a routines perform some function and then present the DOS command prompt for the next DOS-command. See the supplied header files for more information.
Subroutines that operate on files come in two styles: subroutines that use a filename that was parsed from the commandline, and subroutines that use a file that was just opened. The names of these subroutines end in “…ByName” or “…ByFP” respectively.
There is a header file containing common definitions for programs that use P1 DOS functions.
DOS commands
The table below lists all builtin commands and external commands for P1 DOS. The characters ECIP mean:
- E = External command (otherwise the command is builtin)
- C = Change code required to change a file
- I = Inspect code required to read a file
- P = Privileged users only
| ECIP | Command | Meaning |
|---|---|---|
.... | ALLOC | reserve disk space for a new file |
EC.. | AUTORUN | see and change the user’s autorun command |
E... | CASSIN | read data from the cassette tape interface |
.C.. | CCODE | set or modify the change code on a file |
.... | CLEAR | clear the screen |
E.I. | COPY | make a duplicate of a file |
.... | DATE | set the system date |
.C.. | DEALLOC | truncate a file |
.C.. | DELETE | remove a file |
...P | DISKCOPY | duplicate a disk |
...P | DISKRD | transfer data from disk into memory |
...P | DISKWR | transfer data from memory onto disk |
.... | DTYPE | see or set default file type |
.... | DUNIT | set default drive |
.... | ENTER | enter the default codeword |
.... | EXEC | jump to a memory address |
E... | FINFO | show information on a file |
E... | FORMAT | initialise a disk |
.... | FREE | show available disk space |
.C.. | ICODE | set or modify the inspect code on a file |
.C.. | IMAGE | create image file |
...P | INSPECT | view raw disk sectors |
.... | LIST | show the contents of a disk |
..I. | LOAD | place an image into memory |
.... | MEMTEST | verify correctness of RAM memory |
EC.. | PASSWORD | change the password for current user |
..I. | READ | copy file contents into memory |
.C.. | RENAME | change the name of a file |
.... | RESTORE | reset disk drives |
..I. | RUN | place an image into memory and execute |
.... | SIGNON | logon to P1 DOS |
E..P | USER | add new user and show information on a user |
.... | WHEN | show the system date |
.C.. | WRITE | store memory contents into a file |
In the descriptions below, items between [brackets] are optional. Items followed by a + sign can be repeated one or more times. Items followed by an asterisk * can be repeated zero or more times.
ALLOC – reserve disk space for a new file
alloc «filename» «number»Creates the file and allocates «number» blocks to it. The file must not already exist, and there must be sufficient contiguous free space on the drive unit. The command will then ask for the file’s inspect and change code (see ICODE and CCODE); both are set to the same setting. Press Escape at the prompt to not set any restrictions.
AUTORUN – See or change the user’s sign-on command
autorun [«command»]When used without a command shows the current user’s autorun command. Otherwise set the user’s autorun command to the indicated command. This must be an external command, with an image file on drive unit 0. Use “autorun none” to clear.
CASSIN – read data from the cassette tape interface
cassinStarts reading data from the audio cassette tape interface. Prints the start address of each block while reading, and the end address.
CASSIN may need more stop bits than the monitor program does. If you find that it cannot read tapes reliably, use the monitor instead.
CCODE – Set or modify the change code on a file
ccode «filename»The command will ask for Regular file or Personal file. If the user is privileged allow the System option too. Based on the chosen answer, restrict file modification to privileged access, codeword-based access, or access based on sign-on.
CLEAR – Clear the screen
clearErase all contents of the display screen, and present the command prompt in the top-left corner.
COPY – make a duplicate of a file
copy «originalfile» «newfile»Creates a duplicate of the original file onto the same or a different disk. The copy has identical access restrictions as those on the original file; use CCODE and/or ICODE to change its access rights if desired.
DATE – set the system date
dateAsks for the current date, and checks that it is valid. The system does not contain a real-time clock, so only syntactic checks are possible. Dates conform to MM-DD-YY, where MM denotes two digits for the month (e.g. use 08 for August), DD denotes two digits for the day of the month, and YY denotes the last two digits of the year. The checks are incomplete, so take care to enter the right digits. DOS uses the date for files (creation date, date last modified) and for NAME-files (date of last sign-on).
DEALLOC – truncate a file
dealloc «filename» «number»Reduce the length of the file to «number» blocks. If «number» is zero, delete the file without asking for confirmation (unlike DELETE). The information at the end of the file is removed and lost.
DELETE – Remove a file
delete «filename»Remove the indicated filename after confirmation. Any space taken up by the file
becomes free, and all information in the file is lost.
DISKCOPY – duplicate a disk
diskcopy «unitto» «unitfrom»Makes an exact duplicate of all contents of the disk in «unitfrom» onto the disk in «unitto». The previous contents of «unitto» are lost. The destination disk must be formatted. Unit «unitto» cannot be zero, as it contains the system disk.
Note: this will erase the memory in pages 2 and 3 (from address 2000 to 5FFF).
Note: when not privileged, the error is (confusingly) “Invalid command”.
DISKRD – transfer data from disk into memory
diskrd «unit» «track» «sector» «address» «numblocks»Read the number of blocks from the indicated drive unit, starting from the indicated track and sector, and place their contents at the indicated address. Previous memory contents are lost. Take care not to overwrite the memory used by DOS (page 3, address 6000 to 7FFF).
The data from disk may or may not be in use by a file. This command can also be used to read from tracks 0 and 1, which contain file directory information. If possible use the READ command instead.
Note: when not privileged, the error is (confusingly) “Invalid command”.
DISKWR – transfer data from memory onto disk
diskwr «unit» «track» «sector» «address» «numblocks»Store the contents starting from the indicated memory address onto the disk in the indicated drive unit, starting at the indicated track and sector. Writes the indicated number of blocks.
This command will not create a file for the data. If possible use the WRITE command instead.
Note: when not privileged, the error is (confusingly) “Invalid command”.
DTYPE – Set default file type
dtype [«type»]Set the default file type to «type». The initial default type is “SRC”. When no type is supplied, the current default is printed. A type containing invalid characters or longer than 4 characters results in an error.
DUNIT – Set default drive
dunit «unit»Set the default drive unit for filenames. The initial default unit is 0 (the system disk) and «unit» must be less than the number of drives installed in the system. Regardless of DUNIT, NAME and IMAG-files always default to unit 0.
ENTER – Enter the default codeword
enterPrompts for a codeword, which will be tried for file access to files protected by a codeword (Regular). The default codeword is only used when checking for access rights to files, not when creating new files.
EXEC – Jump to a memory address
exec «address»Execution continues at the indicated address. The address is often entered using hexadecimal notation. Use “EXEC 0” to jump to the monitor program, or “EXEC H6000” to restart DOS, for example.
FINFO – show information on a file
finfo «filename»Shows details on the file, including location on the disk, length in blocks, and access restrictions. If the file is an image and inspect access is granted, shows memory locations of all sections and the start address.
When run in supervisor mode, shows details on access rights (including codeword and/or authorised user) as well as the last modification details.
FORMAT – initialise a disk
format «unit»Erases the disk and prepares it for use with DOS. All contents of the disk are lost. FORMAT asks for a confirmation before starting, so you can swap the floppy disk in the drive.
FREE – show available disk space
free «num» +Enter one or more drive units. The command then displays the number of free sectors on each of the drive units.
Free space may not be contiguous but be spread out in small portions between existing files. Since files are always contiguous, having sufficient free space does not mean that a file can be saved or created successfully.
ICODE – Set or modify the inspect code on a file
icode «filename»The command will ask for Regular file or Personal file. If the user is privileged allow the System option too. Based on the chosen answer, restrict file inspection to privileged access, codeword-based access, or access based on sign-on.
If no change code has been set, then set the change code equal to the inspect code. This prevents the situation where anyone can gain access to a file even though an inspect code is set, because the change code overrules the inspect code.
IMAGE – create image file
image «filename» («address» «bytes»)+ [«start»]Creates an image file consisting of one or more chuncks. Each chunck starts at the indicated address and is the indicated number of bytes in length. Optionally a start address can be specified; when the image is run (by typing its name, or using the RUN command) execution commences at this start address. If no start address is specified, the image cannot be run but you can still use the LOAD command to restore its contents into memory.
The type of the filename is ignored, and assumed to be IMAG. If the image file already exists then the change code is required to overwrite it.
INSPECT – view raw disk sectors
inspect «unit» «track» «sector»Shows the hex contents of that sector. Press Return to see the next sector, or any other key to stop. The top line shows the current unit:track-sector.
Note: when not privileged, the error is (confusingly) “Invalid command”.
LIST – show the contents of a disk
list «unit» *Show the directory entries on the drive units (or the default unit). May specify zero or more drive units. The listing pauses at the bottom of the screen to prevent information from scrolling off the page. It then displays “?” to indicate that it is waiting for a keypress. Press Return to continue; press Esc to terminate the listing at any time.
filename.type USES SECTORS St-Es TO Et-Es lastModbBy lastModDate creationDateShows the full filename, and the starting and ending tracks and sectors. Only a privileged user will see the name of the user who last modified the file, and the dates of last modification and creation.
LOAD – place an image into memory
load «filename»Filename contains an image; its contents are loaded into memory but the program is not executed. The type of the file, if any, is ignored and assumed to be IMAG.
MEMTEST – verify correctness of RAM memory
memtestTests RAM from address 1900 up to 7fff. For each pass a period-character is
written on the screen.
This utility overwrites DOS. Press Esc to exit memtest and return to the monitor.
PASSWORD – Change the password for current user
passwordIf a password is currently set then it must be entered. Then the new password must be typed, twice. Change code is required for the user’s NAME-file. This command only changes the password for the currently signed-on user.
READ – Copy file contents into memory
read «filename» «skip» «address» «num»Reads the contents of «filename» and place them into memory at the indicated address, reading «num» blocks. Start reading at block «skip»; use 0 to start reading from the beginning of the file. «num» can be at most 255. «skip»+«length» cannot be greater than the length of the file, and the Invalid Operation message is shown when you try to.
Reading is always in multiples of blocks; you cannot read only part of a block.
RENAME – Change the name of a file
rename «oldname» «newname»Changes the name of the file to the new name. The drive of the new name, if any is given, is ignored.
RESTORE – Reset disk drives
restore «num» +Reset the drive controller and return the head on each of the drives to track 0. Note that with double-sided drives you cannot restore drive units 0 and 1 independently.
RUN – place an image into memory and execute
[run] «filename»The word RUN is optional. If you do not specify a valid builtin DOS command, the command is tried as an external DOS command, from an image. Use RUN when an image file has the same name as an builtin command. For example, to run the program “RESTORE.IMAG”.
«Filename» contains an image; its contents are loaded into memory. If the image contains a starting address, execution then continues at that address: the program is run. The type of the file, if any, is ignored and assumed to be IMAG.
The drive unit of the file, of not specified, defaults to zero regardless of what DUNIT is set to. You can always run images from other units by specifying the drive number of the filename, e.g. run PROG/1
SIGNON – Logon to DOS
signon [«username»]If no or an invalid username is entered, then DOS will ask for one. The file «username».NAME/0 is read, the password is checked (if set), and the sign-on statistics are printed, then updated. If the user has a startup command, that command will be run.
If you try to sign on as a non-existing user (a user without a corresponding NAME-file) the error “File not found” will be shown.
Note: if the disk is write protected, sign-on statistics will not be updated. This means that you can boot P1 DOS from a write-protected disk.
USER – creates or shows information on a user
user «username»If the user does not have a NAME-file, offer to create one, thus creating a new user. Display the user’s number of sign-ons, the date of the last sign-on, the autorun command (if any), and the user’s password.
WHEN – show the system date
whenPrints the current system date. Change this date using the DATE command.
WRITE – Store memory contents into a file
write «filename» «skip» «address» «num»Store the memory contents starting at «address» into «filename», writing «num» blocks. Start writing at block «skip». Use 0 to start writing at the beginning of the file.
«num» can be at most 255. «skip»+«length» cannot be greater than the length of the file, and the Invalid Operation message is shown when you try to.
Writing is always in multiples of blocks; you cannot write only part of a block.
Release notes for version 1.0
To Do and Ideas for Improvement
- Using control characters on the commandline causes backspace into the prompt.
- Expose functions SwapFilename1And2, HideCursor, ShowCursor (or combine both into a single function with R0 == 0 / -1)
- Use a separate DUNIT command for images and work files. The default unit for image is now fixed at unit zero. See the RUN command.
- Create a programmer’s manual, describing the DOS API in detail. For now, read the comments in the source.
Changes made
I/O routines:
- Change the ReadAddress delay in SingleDiskIO from H’2000′ to H’10000′. This solves many Not Ready errors!
- Speed up disk drive step. My drives can handle this.
- Set the number of disk drives to 4. Change NumUnits at address H’60BE’ to your number of drive units minus one.
- Replace the printer code by something that might work for my Centronics interface.
- Add DrvWaitWhileBusy after writing FDC_Reset in SingleDiskIO.
Usability improvements:
- Added a built-in CLEAR command, and several external utilities.
- Small but useful changes to DTYPE, INSPECT, LIST, RUN, ALLOC, SIGNON etc.
- DTYPE checks for illegal characters and types that are too long. Will not overwrite old type on errors. Prints the current default when no type is specified.
- ICODE will also set CCODE if none was set (like ALLOC does) to prevent an
ineffective Inspect code overridden by a blank Change code. - P1 DOS can be booted from a write-protected floppy. In this case the sign-on information (numer of sign-ons and date of last sign-on) cannot be updated.
Code improvements:
- Replaced DATA and ACON by RES, where appropriate.
- Removed unreachable code, two places.
- Code reorganisation: place similar subroutines close together, e.g. all Write routines.
- Replace many absolute instructions by relative instructions (byte savings).
- Added subroutine IsTypeChar and modified ParseFilename accordingly.
- Removed builtins OPEN, CLOSE and LOPEN to create space. They were not useful anyway.
- Add a WriteFilename subroutine to save some bytes on a common function.
- Got rid of Err_Cmdloop_UnlessCorrectCCode, a subroutine that could either
return or jump to the command prompt and never return.
Visual and screen I/O:
- Change the prompt from “Command:” to “DOS>”.
- Add a version string to the startup information.
- Removed the ALL CAPS strings to mixed case.
- Added DOS_ClearScreen to the DOS functions table.
- Shorten the error message Err_NoAccs which was oddly chatty.
- Defaults to full-ASCII character PROMs. Change the code in WriteChar if your character PROMs use a different layout.
Create a solid API for programs that use DOS functions:
- Made sure that the functions in the table of exported subroutines return an error code instead of dropping to the command line.
- AllocByName returns errno_TooSmall when attempting to allocate zero blocks.
- Create header files for programs that use DOS functions, and for DOS utilities.
- Move to the top of the file all internal DOS data storage areas that need to be exposed to programs that use DOS functions. The aim is to avoid changes to the header files when changes are made to DOS, as all program-accessible information is concentrated at the top.
- Add a version constant to the exposed interface.
- Add an interface for rewriting files: ReattachByName.